
Have you ever found yourself stranded on the side of the road, engine sputtering and lights flickering, with no idea how to diagnose the problem? For a 2001 Dodge Ram owner, the answer might lie within the fuse box. This seemingly innocuous box holds the key to understanding and addressing a variety of electrical issues.

Image: diagramenginerhonda.z22.web.core.windows.net
Understanding the 01 Dodge Ram fuse box diagram is a crucial skill for any owner, whether you’re a seasoned mechanic or a weekend warrior. By deciphering the diagram, you can pinpoint the source of electrical problems and safely and effectively resolve them. This guide will provide a comprehensive explanation of the fuse box, its components, and how to use the diagram to troubleshoot common issues.
Locating the Fuse Box
Before diving into the intricacies of the diagram, let’s first locate the fuse box. The 2001 Dodge Ram has two primary fuse boxes: one located in the engine compartment and another inside the passenger compartment.
Engine Compartment Fuse Box
The engine compartment fuse box is typically found beneath the hood, on the driver’s side, near the battery. It’s a black plastic box with a hinged lid. This box contains fuses for various engine components, including the headlights, ignition system, and cooling fans.
Passenger Compartment Fuse Box
The passenger compartment fuse box is generally located on the driver’s side of the dashboard, beneath the steering wheel. This box often houses fuses for interior lights, power windows, and audio components.
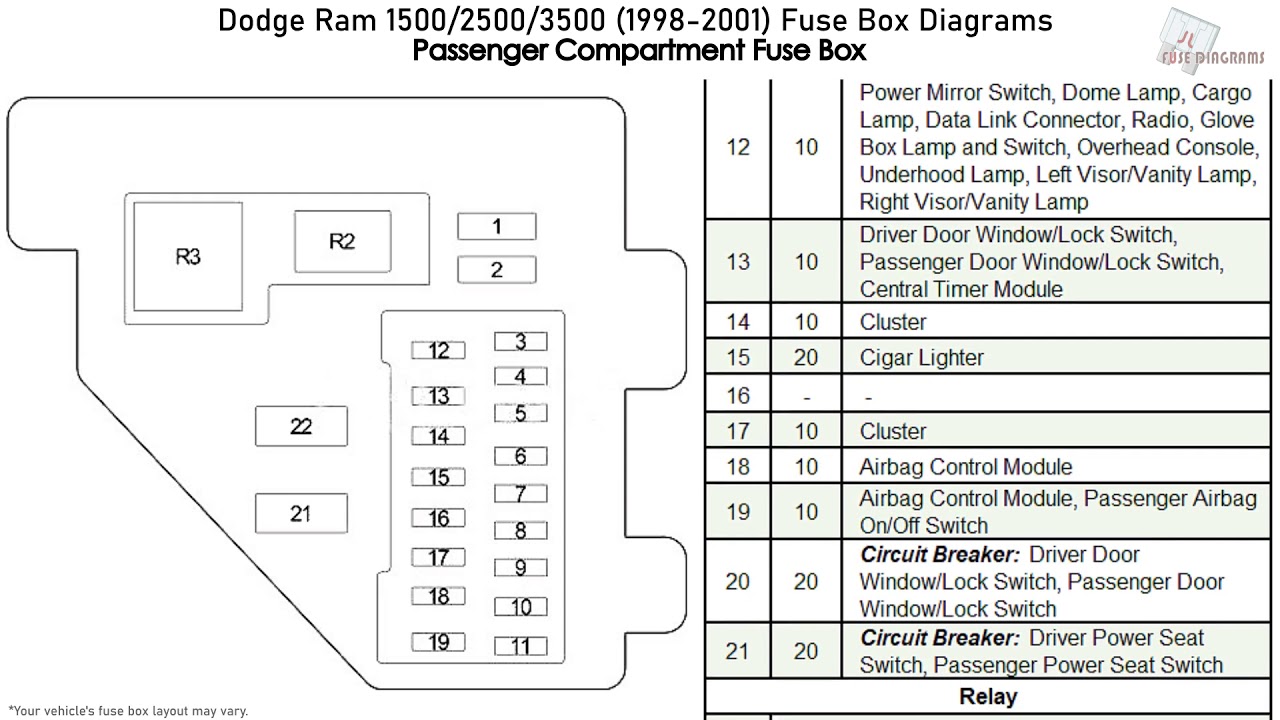
Image: repairenginegarry77.z21.web.core.windows.net
Understanding the Fuse Box Diagram
The fuse box diagram is a visual map that identifies each fuse and its corresponding electrical component. It usually includes a legend explaining the function of each fuse and the amperage it’s rated for.
Key Components
Let’s break down the key components of a fuse box diagram:
- Fuse Numbers: These numbers correspond to the physical fuse locations within the box.
- Circuit Names: These labels identify the specific electrical component that the fuse protects, such as “Headlights,” “Power Windows,” or “Radio.”
- Amperage Rating: This number indicates the maximum electrical current that the fuse can safely handle. If the current exceeds this rating, the fuse will melt, breaking the circuit and preventing further damage.
Troubleshooting Electrical Issues
Now, let’s talk about how to use the fuse box diagram to troubleshoot common electrical issues.
Step 1: Identify the Symptom
First, you need to pinpoint the specific electrical problem you’re experiencing. Is it a dim headlight, a non-functioning radio, or a completely dead engine?
Step 2: Consult the Fuse Box Diagram
Locate the relevant circuit name on the diagram that corresponds to the malfunctioning component. For example, if you have a dead headlight, look for the “Headlights” circuit.
Step 3: Inspect the Fuse
Check the fuse that’s designated for the specific circuit. Visually inspect the fuse for any signs of damage, such as a broken filament or a blown fuse.
Step 4: Replace the Fuse (If Necessary)
If the fuse is blown, replace it with a new fuse of the same amperage rating. Ensure you handle the fuses with caution to avoid accidental contact with the metallic terminals.
Important Precautions
While troubleshooting electrical issues can seem straightforward, safety should always come first. Here are some important precautions to keep in mind:
- Disconnect the battery: Before working on any electrical component, disconnect the negative terminal of the battery to prevent electrical shocks.
- Use caution with tools: Avoid using metal tools near open electrical circuits to prevent accidental grounding.
- Don’t exceed amperage ratings: Always use fuses with the appropriate amperage rating to ensure safety and avoid damage to electrical components.
Additional Tips
Here are some additional tips for effectively troubleshooting electrical issues using the fuse box diagram:
- Refer to the owner’s manual: Your Dodge Ram’s owner’s manual contains detailed information about the fuse box, including specific fuse locations and their functions.
- Use a test light: A test light can help determine if a fuse is blown. Simply touch the test light probe to one end of the fuse and the other probe to the fuse holder to see if the light illuminates.
- Perform a visual inspection: Look for any signs of wear, corrosion, or loose connections on the fuse box and its components.
- Don’t hesitate to seek professional help: If you feel unsure about any aspect of electrical troubleshooting, don’t hesitate to consult a qualified mechanic.
01 Dodge Ram Fuse Box Diagram
Conclusion
The 01 Dodge Ram fuse box diagram is an invaluable tool for understanding and troubleshooting electrical issues. By familiarizing yourself with the diagram and following the steps outlined in this guide, you can confidently diagnose and resolve common electrical problems, saving yourself time, money, and frustration. Remember to always prioritize safety when working with electrical components and don’t hesitate to seek professional help when needed.


